I have never done any mobile development so it is a new journey for me. I thought the others may benefit from my experience. The most difficult steps are the initial ones. After that the software experience kicks-in and the development process just becomes coming to grips with the Android libraries.
The first step is to get the environment set up by downloading appropriate software. The standard advice is to follow these steps:
1) set up java sdk
2) set up Eclipse
3) set up Android SDK
4) set up Android plug-in from
To my surprise, it is much easier than that. All one has to do is to download the Android bundle from http://developer.android.com/sdk/index.html which has all the necessary components. It is just a matter of unzipping the download in a preferred directory.
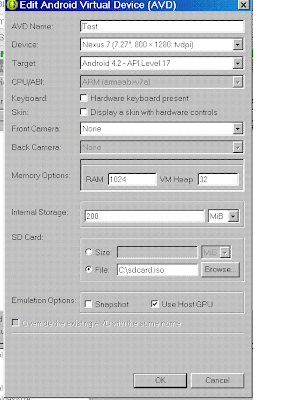
Before any application development starts, it is best to create an Android Virtual Device (AVD)emulator by going into Windows/Android Virtual Device Manager. The knowledge of setting up emulators will obviously help with testing the developed application on various platforms. I share my settings:
The SD card file shown as c:\sdcard.iso was created by using the mksdcard.exe in the sdk/tools directory of the bundle installation. Simply change to the tools directory and issue the command
mksdcard 64M c:\sdcard.iso
Obviously this step has to be done before the AVD creation. I had difficulty in getting the AVD setup correctly. There were initially errors:
35 - Emulator] Failed to create Context 0x3005
[2012-12-29 08:34:35 - Emulator] emulator: WARNING: Could not initialize OpenglES emulation, using software renderer.
[2012-12-29 08:34:
The above set up resolved the issues for me so I have shared the image.
OK. You are set to go. Enjoy!
Saturday, December 29, 2012
Subscribe to:
Comments (Atom)

